sudo apt-get install sqlite3
sqlite3 ~/.xbmc/userdata/Database/<MyVideos777.db> \
    "update files set playCount='',lastPlayed='';"
– Insert your db-filename as sqlite3 parameter.
– Tested in XMBC 13.1
sudo apt-get install sqlite3
sqlite3 ~/.xbmc/userdata/Database/<MyVideos777.db> \
"update files set playCount='',lastPlayed='';"
– Insert your db-filename as sqlite3 parameter.
– Tested in XMBC 13.1
1. f2f3; e7e5
2. g2g4; d8h4
I spent a lot of hours before realizing that Ubuntu 14.04 blocks tcp by default.
One can check this by
ps aux | grep X
root      1127  0.1  3.4 364380 71748 tty7     Ss+  12:08   0:00 /usr/bin/X -core :0
   -seat seat0 -auth /var/run/lightdm/root/:0 -nolisten tcp vt7 -novtswitch
Notice the -nolisten option in output.
To enable it, add xserver-allow-tcp=true to lightdm:
sudo vi /usr/share/lightdm/lightdm.conf.d/50-xserver-command.conf
 [SeatDefaults]
 # Dump core
 xserver-command=X -core
 xserver-allow-tcp=true
Restart X (or reboot) and forward X11 desktop by launching:
# server
export DISPLAY=<your-localhost-ip>:0

# client
xhost +
You can test Display forwarding by launching on server
xeyes
При подключении к сети Yota DNS сервера подкачиваются автоматически. Иногда этого не происходит.
Сообщение об ошибке:
Server not found hello.yota.ru
Сервер не найден hello.yota.ru
Невозможно зайти на my.yota.ru (личный кабинет), hello.yota.ru (активация бесплатного интернет) работает только главный сайт yota.ru
Решить данную проблему можно с помощью прописывания вручную DNS серверов.
DNS, которые мне продиктовал саппорт по телефону:
94.25.208.74
8.8.8.8
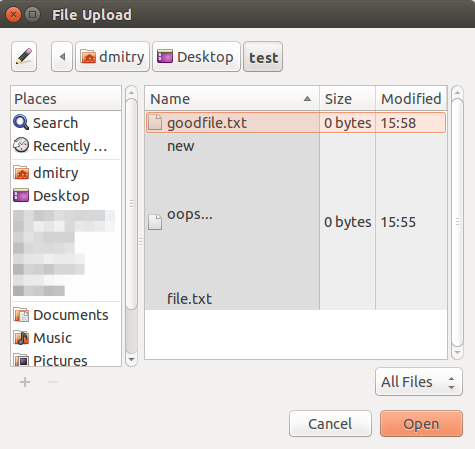
If for some reasons one needs to create a file with UTF symbols in filename, the following command helps:
touch new$'\n'file.txt
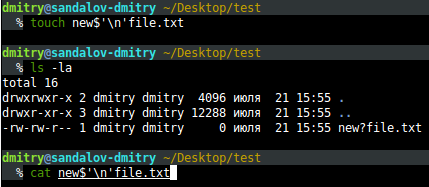
Or you can simply rename existing file:
mv goodfile.txt bad$'\n'file.txt
mv goodfile.txt $'bad\nfile.txt'
Hope this helps 🙂
#!/bin/bash
# Goes through all jpeg files in current directory, grabs date from each
# and sorts them into subdirectories according to the date
# Creates subdirectories corresponding to the dates as necessary.
# Moves mov files by file creation date.

# sudo apt-get install imagemagick
for fil in *.JPG
do
    datepath="$(identify -verbose $fil | grep DateTimeOri | awk '{print $2 }' | sed s%:%%g)"
    if ! test -e "$datepath"; then
        mkdir -pv "$datepath"
    fi

    mv -v $fil $datepath
done

for mov in *.MOV
do
    datepath="$(stat $mov | grep Modify | awk '{print $2}' | sed s%-%%g)"
    if ! test -e "$datepath"; then
        mkdir -pv "$datepath"
    fi

    mv -v $mov $datepath
done
Credits: linuxjournal
Install Trac
# install trac package from Ubuntu repo
sudo apt-get install trac

# init the project files
sudo mkdir -p /var/trac/myproject
cd /var/trac/myproject
sudo trac-admin . initenv

# basic authentication
sudo apt-get install apache2-utils
sudo htpasswd -c .htpasswd adminusername
sudo trac-admin . permission add adminusername TRAC_ADMIN

# folder permissions
sudo chown -R www-data: .
sudo chmod -R 775 .
cp wsgi_trac.py -> /var/trac/myproject/
import os
import sys
import trac.web.main
sys.stdout=sys.stderr
os.environ['TRAC_ENV'] = '/var/trac/myproject'
application = trac.web.main.dispatch_request
cp to /etc/nginx/sites-enabled/trac.conf or add to /etc/nginx/nginx.conf
server {
  listen  80;
  server_name  trac.local;

  location / {
    auth_basic_user_file /var/trac/myproject/.htpasswd;
    auth_basic 'this is not for you';
    uwsgi_param REMOTE_USER $remote_user;

    include  uwsgi_params;
    uwsgi_pass  127.0.0.1:5544;
  }
}
cp trac_uwsgi.ini -> /etc/uwsgi/apps-enabled/
[uwsgi]
uid=trac
gid=tracsys
chmod-socket=777
chown-socket=trac
chdir = /var/trac/myproject
socket = 127.0.0.1:5544
module = wsgi_trac:application
processes = 2
master = 1
restart the services
sudo service nginx restart && sudo service uwsgi restart
Credits: dev-smart, habrahabr.
P.S. Don’t forget about Nginx uwsgi_param REMOTE_USER for authentication to work.
I spent a lot of nerves fixing Trac Error: Authentication information not available 🙂
Add at the beginning of /etc/rsyslog.d/50-default.conf:
$template PerHostLog,"/var/log/filename.log"
if $fromhost-ip != ’127.0.0.1′ then -?PerHostLog
& ~
Uncomment the lines in /etc/rsyslog.conf:
$ModLoad imudp
$UDPServerRun 514
$ModLoad imtcp
$InputTCPServerRun 514
Restart the service
sudo service rsyslog restart
Don’t forget to tune the permissions:
sudo chown syslog:syslog /var/log
This method is generally used if you are targeting a specific output file size and output quality from frame to frame is of less importance. This is best explained with an example. Your video is 10 minutes (600 seconds) long and an output of 50 MB is desired. Since bitrate = file size / duration:
(50 MB * 8192 [converts MB to kilobits]) / 600 seconds = ~683 kilobits/s total bitrate
683k – 128k (desired audio bitrate) = 555k video bitrate
avconv -y -i video.mkv -c:v libx264 -preset medium -b:v 555k -pass 1 -an -sn -f matroska /dev/null && \
avconv -i video.mkv -c:v libx264 -preset medium -b:v 555k -pass 2 -c:a libmp3lame -ac 2 -b:a 128k \
 -c:s copy -map 0:0 -map 0:1 -map 0:2 -map 0:3 video_out.mkv
sendPost = function(url, data) {
    var xmlhttp = new XMLHttpRequest();
    var params = serialize(data);

    xmlhttp.open("POST", url, true);
    xmlhttp.setRequestHeader("Content-Type", "application/x-www-form-urlencoded");
    xmlhttp.setRequestHeader("Content-length", params.length);
    xmlhttp.setRequestHeader("Connection", "close");

    xmlhttp.send(params);

    xmlhttp.onreadystatechange = function() {
        if (xmlhttp.readyState === 4 && xmlhttp.status === 200){
            console.log(xmlhttp.responseText);
        }
    };
}

serialize = function(obj, prefix) {
    var str = [];
    for(var p in obj) {
        var k = prefix ? prefix + "[" + p + "]" : p, v = obj[p];
        str.push(typeof v == "object" ?
                serialize(v, k) :
                encodeURIComponent(k) + "=" + encodeURIComponent(v));
    }
    return str.join("&");
}

sendPost("http://some/host", {login: 'me@abc.def', password: 'mypassword'});
curl 'http://some/host' --data 'login=me%40abc.def&password=mypassword'