Auto switch to A2DP bluetooth device when connected in Ubuntu

Add to /etc/pulse/default.pa to automatically switch pulseaudio sink to Bluez:

 .ifexists module-bluetooth-discover.so
 load-module module-bluetooth-discover
 load-module module-switch-on-connect  # Add this
 .endif

Modify /etc/bluetooth/audio.conf to auto select A2DP profile (instead of HSP/HFP):

 [General]
 Disable=Headset # Add this

Apply changes:

sudo pulseaudio -k # Restarts pulseaudio
sudo restart --system bluetooth # Restarts BT

IMAP/SMTP via HTTPS Proxy

In some places internet access is provided via proxy. Some proxies block imap and smtp and allow only ports 80 and 443. If your email client doesn’t have proxy configuration (like my beloved Mutt), then you need to forward imap and smtp by hand. If the proxy you are behind supports https this means you can bypass it via https connect method.

To demonstrate that I’ll install Proxytunnel on my Ubuntu 14.04. After that I am creating 2 upstart scripts that launch proxy-tunnel daemons from proxy to imap/smtp (in this example to gmail’s servers). The daemons are started on system’s boot and are listening for imap connections on localhost:993 and smtp on localhost:993. For simplicity I’m adding my mail servers to hosts file, without that I would need to reconfigure my mail client to use localhost instead of *.gmail.com.

sudo apt-get install proxytunnel
sudo touch /etc/init/tunnel-imap.conf /etc/init/tunnel-smtp.conf
sudo chmod 644 /etc/init/tunnel-imap.conf /etc/init/tunnel-smtp.conf

/etc/init/tunnel-imap.conf:

# proxy daemon for Gmail

description     "proxy daemon for Gmail imap"

start on runlevel [2345]

expect fork
respawn
respawn limit 10 5

exec    /usr/bin/proxytunnel -p proxy.com:80 -d imap.gmail.com:993 -a 993

/etc/init/tunnel-smtp.conf:

# proxy daemon for Gmail

description     "proxy daemon for Gmail smtp"

start on runlevel [2345]

expect fork
respawn
respawn limit 10 5

exec    /usr/bin/proxytunnel -p proxy.com:80 -d smtp.gmail.com:587 -a 587

add to /etc/hosts:

127.0.1.1   imap.gmail.com
127.0.1.1   smtp.gmail.com

Reboot

Tip 1: if you are an Upstart guru, you can make 1 upstart script instead of 2 🙂
Tip 2: one can use iptables instead of hosts

# iptables -t nat -A OUTPUT -d smtp.gmail.com -j DNAT --to-destination 127.0.1.1

Tip 3: there is a Python script that does the same job (didn’t test it)

Чёрный экран Minecraft в Ubuntu

Minecraft не поддерживает ни OpenJDK, ни Oracle JDK 7. Для решения проблемы требуется установка Oracle JDK 6:

sudo add-apt-repository ppa:webupd8team/java
sudo apt-get update
sudo apt-get install oracle-java6-installer
sudo update-alternatives --config java

Запуск:

java -jar /path_to_minecraft/minecraft.jar

Или правой кнопкой на JAR -> Oracle Java 6.

Vala 0.18.1 hello world in Ubuntu 12.10

After this tutorial you’ll learn how to compile your first vala GTK program
Screenshot from 2013-01-19 00:22:05

Prepare your system:

# add the GPG key for the vala team PPA
sudo apt-key adv --recv-keys --keyserver keyserver.ubuntu.com 7DAAC99C
# add the PPA to your Software Sources
sudo add-apt-repository ppa:vala-team
# update the package lists
sudo apt-get update
# install vala
sudo apt-get install valac-0.18 vala-0.18-doc valac-0.18-dbg
valac --version

# optionally install other PPA packages
# libgee - collections library
sudo apt-get install libgee-dev 

# install gtk-dev
sudo apt-get install libgtk-3-dev

Save program text to hello.vala file:

using Gtk;
 
int main (string[] args) {
    Gtk.init(ref args);
 
    var window = new Window();
    window.title = "Hello, World!";
    window.border_width = 10;
    window.window_position = WindowPosition.CENTER;
    window.set_default_size(350, 70);
    window.destroy.connect(Gtk.main_quit);
 
    var label = new Label("Hello, World!");
 
    window.add(label);
    window.show_all();
 
    Gtk.main();
    return 0;
}

Compile and launch the prog:

valac --pkg gtk+-3.0 hello.vala && ./hello

Streaming audio from Ubuntu Linux to a DLNA player without Rygel

Recently, I became the proud owner of Onkyo TX-NR515 receiver. This device is DLNA MediaRenderer as upnp-inspector says. The A/V receiver is from the 2012 devices family (TX-NR414/TX-NR515/TX-NR616).

Streaming the sound from PC to my DLNA device over wlan was a tough task, but I managed to solve it the way I’ll describe below. The main idea is to pass the alsa/pulseaudio output stream over LAN to DLNA device. There are 2 ways of doing it: with DLNA server or without.

Continue reading

OSQA: Ubuntu with Apache and MySQL

About This Installation Guide

Before you begin OSQA installation, you first need to get the source code from subversion. You can receive instruction on how to do this from our Download OSQA page . This guide covers the installation of OSQA on the Ubuntu operating system using a MySQL database. If you’ve achieved a successful installation on Windows, Mac, or any other OS, we are interested in adding your installation methods to our upcoming guides for those systems. To successfully install OSQA, simply perform the instructions in each section as you scroll down the page. Continue reading

OSQA install experience

OSQA is an opensource Q/A engine. In this article I’ll describe the way I installed it on my VPS.

I like Debian/Ubuntu OS. Debian lacks new packages, that’s why I chose Ubuntu 12.04 LTS.

Act 1. Lighttpd

I had Lighttpd installed on my machine, so firstly I tried to install OSQA on Lighttpd. Googling around I found that running OSQA in fcgi mode is not OK (when you have a VPS). WSGI is the right way. Unfortunately, Lighttpd’s WSGI is very unstable, experimental and unsupported. That’s why I decided to move to nginx.

Act 2. nginx

Django projects are great with pure WSGI servers. So I decided to install nginx with WSGI server (uWSGI, GUnicorn, etc.). Spending 3 days, writing LOTS of site blocks, tuning nginx, messing around with various WSGI servers, I finally switched to Apache.

Act 3. Apache

My Apache/Ubuntu way was as described in article on meta.osqa.com. After doing the steps I received 500 errors as well as this:

Middleware module "django.middleware.csrf" does not 
define a "CsrfResponseMiddleware" class

OSQA is not compatible with Django 1.4.0, but works OK in 1.3.1. Check your version:

python
>>> import django
>>> django.VERSION

If necessary install 1.3.1:

sudo easy_install django==1.3.1

P.S.

In my spare time I’ll continue playing with nginx + uWSGI (or gunicorn), I think it’s the best way of running OSQA.

Установка Windows 7 через USB-флешку (UNetbootin)

1. Для установки Windows 7 с флешки нужно изначально отформатировать её в NTFS. Флешки, отформатированные в FAT32 не подойдут.
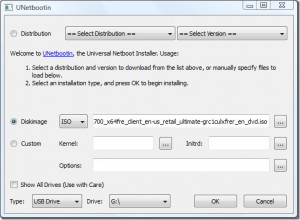
2. Скачать Unetbootin версии 494 (или 490). В последних версиях Unetbootin убрали галочку “показать все устройства”. Без неё вам Unetbootin не покажет устройства с NTFS. Также для Linux необходимо добавить права на выполнение (в Windows нужно просто распаковать архив):

chmod 755 unetbootin-linux-494
./unetbootin-linux-494


3. Указать путь к образу ISO
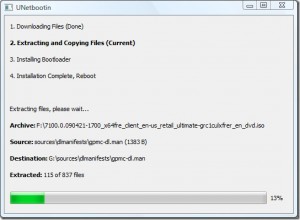
4. Дождаться (минут 15) пока система скопирует на флешку файлы и сделает её загрузочной

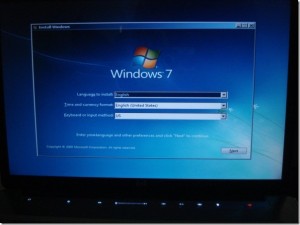
5. Вставить флешку в нужный компьютер, загрузиться с неё.

Credits:
http://www.addictivetips.com/windows-tips/install-windows-7-from-usb-drive-requires-2-simple-steps/
http://www.webupd8.org/2010/10/create-bootable-windows-7-usb-drive.html