Русификация OSQA

  1. Скачать нормальный русский перевод здесь
  2. Открыть файл django.po Заменить все значения /bht/ на /default/ (/Название темы/ )
  3. Заменить файлы django.mo django.po на скачанные /osqa-server/locale/ru/LC_MESSAGES
  4. В файле settings_local.py следующая настройка LANGUAGE_CODE = ‘ru’
  5. Выполнить команду sudo django-admin.py makemessages -l ru -e html,txt -e xml
    (Может потребоваться sudo apt-get install gettext)
  6. Перезагрузить Апач sudo /etc/init.d/apache2 restart

Мой форк перевода OSQA: у меня на Github.

OSQA: Ubuntu with Apache and MySQL

About This Installation Guide

Before you begin OSQA installation, you first need to get the source code from subversion. You can receive instruction on how to do this from our Download OSQA page . This guide covers the installation of OSQA on the Ubuntu operating system using a MySQL database. If you’ve achieved a successful installation on Windows, Mac, or any other OS, we are interested in adding your installation methods to our upcoming guides for those systems. To successfully install OSQA, simply perform the instructions in each section as you scroll down the page. Continue reading

OSQA install experience

OSQA is an opensource Q/A engine. In this article I’ll describe the way I installed it on my VPS.

I like Debian/Ubuntu OS. Debian lacks new packages, that’s why I chose Ubuntu 12.04 LTS.

Act 1. Lighttpd

I had Lighttpd installed on my machine, so firstly I tried to install OSQA on Lighttpd. Googling around I found that running OSQA in fcgi mode is not OK (when you have a VPS). WSGI is the right way. Unfortunately, Lighttpd’s WSGI is very unstable, experimental and unsupported. That’s why I decided to move to nginx.

Act 2. nginx

Django projects are great with pure WSGI servers. So I decided to install nginx with WSGI server (uWSGI, GUnicorn, etc.). Spending 3 days, writing LOTS of site blocks, tuning nginx, messing around with various WSGI servers, I finally switched to Apache.

Act 3. Apache

My Apache/Ubuntu way was as described in article on meta.osqa.com. After doing the steps I received 500 errors as well as this:

Middleware module "django.middleware.csrf" does not 
define a "CsrfResponseMiddleware" class

OSQA is not compatible with Django 1.4.0, but works OK in 1.3.1. Check your version:

python
>>> import django
>>> django.VERSION

If necessary install 1.3.1:

sudo easy_install django==1.3.1

P.S.

In my spare time I’ll continue playing with nginx + uWSGI (or gunicorn), I think it’s the best way of running OSQA.
Yota в MeeGo Linux 1.2 Original

При установке MeeGo от LinuxCenter Yota работает сразу же. Но что делать тем, кто ставил оригинальную ОС с сайта MeeGo? Скачав MeeGo 1.2 для Cedar Trail с официального сайта, я принялся за настройку моего брелка Yota SWC-U200.

Для работы Yota под Linux необходимо установить пакет madwimax, которого нет в репах по умолчанию. Madwimax имеет зависимость dhclient, которого тоже нет в репах.

Сначала подключил репы Linuxcenter (спасибо Якову Мироничеву за полезный пост). Репы 1.1 катят для 1.2:

sudo zypper addrepo http://meego.linuxcenter.ru/MeeGo/releases/1.1/core/repos/ia32/packages/ "linuxcenter"

Затем их обновил:

sudo zypper refresh

Поставил dhclient:

sudo zypper install dhclient

Качнул madwimax у Mezon и запустил:

cd ~/Downloads
wget http://meego.linuxcenter.ru/Mezon/builds/trunk/daily/core/repos/ia32/packages/i586/madwimax-0.1.1-2.mezon.1.0.i586.rpm
sudo rpm -i madwimax-0.1.1-2.mezon.1.0.i586.rpm
sudo madwimax

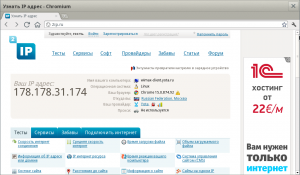
Проверил, в ifconfig появился новый интерфейс, а MeeGo сообщил, что я успешно подсоединился к Wired Network. Проверил IP (2ip.ru), действительно, Yota 🙂

На всякий случай кидаю сюда RPM:
dhclient-4.0.1p1-6.10.i586.rpm
madwimax-0.1.1-2.mezon.1.0.i586.rpm

Установка Windows 7 через USB-флешку (UNetbootin)

1. Для установки Windows 7 с флешки нужно изначально отформатировать её в NTFS. Флешки, отформатированные в FAT32 не подойдут.
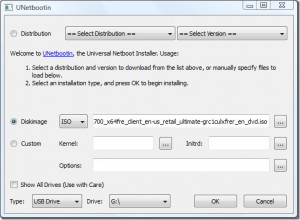
2. Скачать Unetbootin версии 494 (или 490). В последних версиях Unetbootin убрали галочку “показать все устройства”. Без неё вам Unetbootin не покажет устройства с NTFS. Также для Linux необходимо добавить права на выполнение (в Windows нужно просто распаковать архив):

chmod 755 unetbootin-linux-494
./unetbootin-linux-494


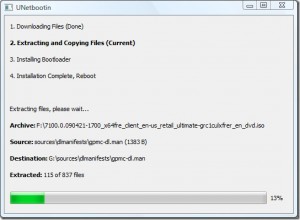
3. Указать путь к образу ISO
4. Дождаться (минут 15) пока система скопирует на флешку файлы и сделает её загрузочной

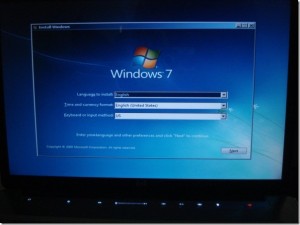
5. Вставить флешку в нужный компьютер, загрузиться с неё.

Credits:
http://www.addictivetips.com/windows-tips/install-windows-7-from-usb-drive-requires-2-simple-steps/
http://www.webupd8.org/2010/10/create-bootable-windows-7-usb-drive.html

Bulk ffmpeg encoding

Code:

 find . -name '*.AVI' -exec ffmpeg -i {} -b 1600k {}.mpeg \;

Using ffmpeg to encode video for my Android phone:

find . -iname "*" -exec ffmpeg -i {} -s 480x320 -vcodec mpeg4 \
  -acodec aac -ac 1 -ar 16000 -r 13 -ab 32000 -aspect 3:2 \
  -strict experimental {}.mp4 \;

Explanation:

find command searches for all files with AVI extention and for each of them executes command after —exec switch (which is ffmpeg -i input file -b bit rate). Curly brackets stand for currently found file.

SSH through HTTP proxy

This article explains how to connect to a ssh server located on the internet from a local network protected by a firewall through a HTTPS proxy.

Requirement are :

  • Your firewall has to allow HTTPS connections through a proxy
  • You need to have root access to the server where ssh is listening

Configure the ssh server

The ssh daemon need to listen on 443 port. To accomplish this, just edit this file (on debian system) /etc/ssh/sshd_config and add this line :

Port 443

Then restart the daemon :

sudo /etc/init.d/ssh restart

Configure the client

I suppose you are on a Linux system (debian for example). First you have to compile the connect binary which will help your ssh client to use proxies (HTTPS in our case). Then you have to configure your ssh client to tell him to use HTTPS proxy when he tries to connect to your ssh server.

  1. Install the connect software :
    • On debian system, just install the connect-proxypackage :

      sudo apt-get install connect-proxy
    • On other Linux systems, you have to compile it :

      cd /tmp/
      wget http://www.meadowy.org/~gotoh/ssh/connect.c
      gcc connect.c -o connect
      sudo cp connect /usr/local/bin/ ; chmod +x /usr/local/bin/connect
  2. Configure your ssh client. Open or create your ~/.ssh/configfile and add these lines :

    ## Outside of the firewall, with HTTPS proxy
    Host my-ssh-server-host.net
      ProxyCommand connect -H proxy.free.fr:3128 %h 443
    ## Inside the firewall (do not use proxy)
    Host *
       ProxyCommand connect %h %p
  3. Then pray and test the connection :

    ssh my-ssh-server-host.net

SSH to another server through the tunnel

For example to connect to in ssh github.com :

Host github.com
  ProxyCommand=ssh my-ssh-server-host.net "/bin/nc -w1 %h %p"

Credits: zeitoun.net